Amazing catches with the Blair Mouse
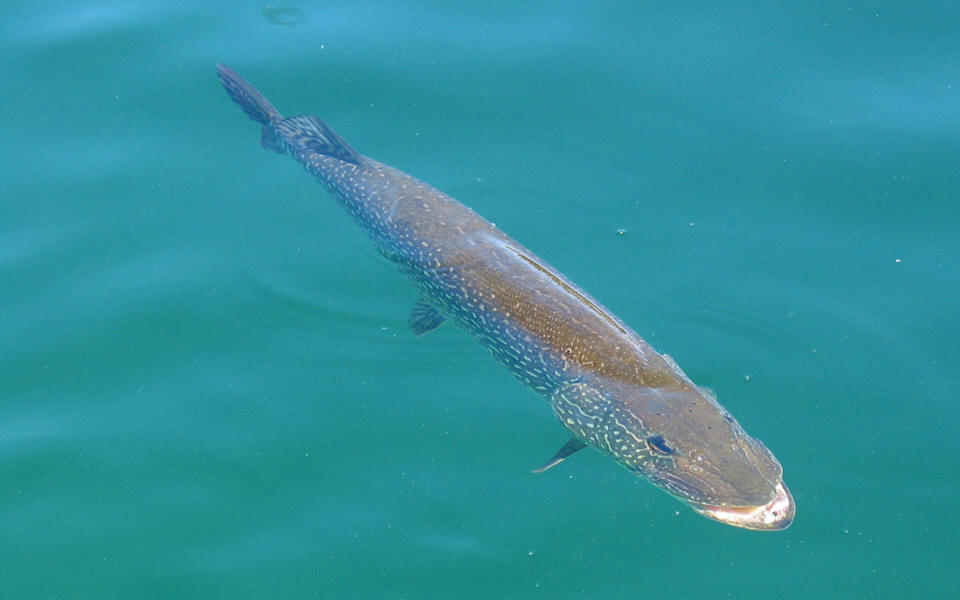
I absolutely have to include this pattern on my website, especially after I caught my biggest ever freshwater fish with it. Not even once, but twice and in the same year and trip as well. The results: A beautiful 113cm Lake trout (23kg) and a 132cm Northern Pike (14.8kg) both caught in the Yukon Territory in 2003.


Thanks to Bob Kenly who kindly sent me this particular pattern to try and test it for lake trout and pike in the most northern and remote places of Canada.
The Blair Mouse Project
By Bob Kenly
Sheesh !!!!!!! if that’s a mouse I’ll eat it myself. In fact my first reaction was it represented more like something my cat threw up wearing a life vest and what’s with those long different colored rubber legs? I had been searching the web looking for a mouse pattern a client requested as he was heading to a once in a lifetime trip to Kamchatka. I had clicked on The Fly Shop’s web site, www.theflyshop.com, a source of inspiration their catalog had provide me over the years for my own line of tube flies specializing in Pacific salmon and steelhead. I even laughed when I read the pattern’s name, ” The Blair Mouse Project”, probably named somewhat after a cult film I absolutely hated and didn’t have a clue what all the talk was about.
The pattern’s originator, Will Blair, happens to be the person who handles Russian and British Columbia travel at The Fly Shop in Redding California. Having five years in Kamchatka as a camp owner/manager and head guide was creditable enough by my standards so I phoned him asking if he minded me converting his pattern to a tube fly, which he graciously granted. He told me basically The Blair Mouse was an invention born from necessity as finding tying materials in Russia can be a daunting task at best and his are shaggier than the commercial version, also the mouse is a huge success in Alaska’s Bristol Bay region, in his exact wording, “devastatingly effective”.
Being somewhat hard-headed I still wasn’t that convinced this would be the mouse pattern my client needed but what the heck I had plenty of time to experiment so I tied a prototype to play with. Staring at this thing in my vise for a few days it dawned on me this might just be a better mouse pattern after all, in fact bordering on pure genius, no cute little ears or eyes which basically are more for effect than practicality. Taking the mouse to my high tech testing tank (OK, so its my bathtub) pulling it back and forth and one thing for sure it would make a wake alright, a very convincing wake just like a real mouse would swimming for its life. The long rubber legs, I didn’t know what else to call them, added to the wake although the different colors still eluded me but since the original is tied that way, why mess with success is my philosophy. I took my borrowed creation to the lake near my home in South-western Missouri for further testing. Weighing almost nothing I could cast it all day long. It sat low in the water, in fact most of the body was under the surface again just like the real thing in trouble. Back home for more high tech testing (this time my wife’s clear glass vase, while she was out shopping) and viewed the mouse as a fish would see it, yep! It looked like a mouse alright, a shaggy Arctic mouse to be exact.
With obvious relief I notified my client that I was successful locating the pattern which would insure success after a long exhausting trip from his home in Florida to the “wild East” of Russia but first I would want him to try it with his rod and get his opinion. He was ecstatic with the overall performance and look of the finished product. His only criticism was the overall size was a bit too large for his 6-weight rod, scaling the fly down would be no problem The search for my client’s pattern solved I was off to tie him his Russian trout flies.
So, other than big Arctic trout what else could this fly be used for, how about hot pink or bright green for Silver salmon ( without the legs of course). Or, a skating Steelhead fly. I have a friend in Canada who’s going to try a huge six inch one for Pike (now this something I really have to see). At the risk of “polluting” (written with an evil grin on my face) hallowed traditional thinking, might not this fly make a good substitution for a skating Atlantic salmon fly instead of the usual Bomber style flies ?
Tying The Blair Project Mouse
Tube: Plastic, I prefer the HMH 5 inch trout tubes cutting them in half.
If however you prefer a hook a “stinger hook” in size #6 or #4 is a good choice.
Thread: I use a flat waxed 6/0 thread (since the thread is buried in the hair being exact in color isn’t necessary)
Body: My personal choice is Deer body hair since its readily available in many colors close in hues to real mice. But certainly there are many more choices to pick from, Blair uses Antelope belly hair. Caribou (or Reindeer as its called in some in some countries) and Moose are all acceptable choices.
Legs: I scrounged some rubber skirt material from a local fishing shop using the same color scheme Blair suggested, four black legs on the right side and four orange on the left side. His reason for using this material in such a manner was to give the illusion of the furious swimming action of mice in water, a fact he observed first hand. As far as color choices went it was more of a personal choice, contrast to be exact. His term “devastatingly effective” was all the reason I needed to follow his lead.
Life Vest: 2 mm tying foam (even though the catalog showed the foam to be white I chose a light brown more for aesthetic reasons than anything else). In reality the topping has some very special factors which makes this pattern so effective. First,it provides the necessary flotation. Second, it establishes the overall illusion of a mouse with his head above the water. Finally third, the front being at an angle acts as a plow device which gives the swimming action and establishes the required wake necessary for effective mouse patterns.
Remember, one thing when tying this pattern, neatness doesn’t count. In fact the shaggier the better, Cold weather mice unlike the home grown verity have very stiff and shaggy guard hairs to protect their soft undercoats which provide their bodies with warmth.
Picture #1:

When tying on tubes I always form a small knot on the plastic tubes with a lighter, attach the hook keeper, attach it with thread windings and epoxy the thread. Although this seems contrary to conventional wisdom its something I’ve always done to prevent the loss of the keeper. After drying insert the tube in your tube device and start by making several wraps of thread where you’re going to place your first clump of hair.
Pictures #2:


Start by spinning a nice clump of hair with the tips facing rearward on top of the tube, only about halfway or slightly more around the tube is all that’s required. Turn the tube over and spin on another clump of hair, this time with with the butts facing rearwards (I do this because mice tend to have a lighter color on their bellies). Trim off the excess hair so that it forms a smooth transition for the next clump of hair. Whip finish and cement the thread wrappings.
Pictures #3:


Again, do the same thing with the hairs overlapping the previous clumps of hair. Trim the excess hair, whip finish and cement the thread windings. Now is the time to add the legs, four on each side and don’t give me any grief about the colors or which side goes where, just about any dark color will probably suffice. You can always shorten the legs later but I usually leave them longer so that I can tie them back with a small piece of aluminium foil (later we’ll be using some epoxy to cover the threads at the head and the legs always have a nasty habit of landing in the wet epoxy while turning).
Pictures #4:

Now we put on the last clumps of hair like before with the hairs overlapping. When you trim the excess butts, trim the top close to make a smooth transition for the topping but leave the bottom hairs a bit longer. After I whip finish I apply cement to the threads and the bottom hair and fold back to protect the thread.

Pictures #5 & 6:


Now is the time to trim the belly although I guess you could wait till the fly
is finished. Trim the belly flat so that the fly sits level in the water, I have used both a double edged razor blade and scissors and find the scissors give me that ragged look I find so pleasing.
Picture #7:

Cut a piece of the foam in the general shape shown (I make a cardboard pattern and prefit it to the fly, about ¾ of the length of the fly is about right).
Picture #8:

Lay a thread base for the topping and the tie on the topping to the tube (or
hook). Prop up the lip at the desired angle, epoxy the threads on top and under the topping making sure you also epoxy the area around the neck area as this will be the weakest point of the topping ( the epoxy soaks into the foam reinforcing that area). Also place a small amount of epoxy under the lip to prop up the lip at the desired angle. After dried cut the excess tube off.
Picture #9

The finished product. Should you need to trim it a bit, go ahead you’re
not going to hurt it one bit.