Flies to catch “Inconnu”
When I started to explore the feeding behaviour of the Inconnu, I found that spoons were most successful in inciting them to strike. I, therefore, wanted a good trade off between realistic fish fry and a streamer. I actually had put all my efforts into designing a small streamer with the same action and mobility as a huge well-proven pike fly. To accomplish this, I chose a very short hook shank. I didn’t want to tie the flies as big as the huge and famous pike flies that we use in Holland, because I already knew this wouldn’t work. The bait the Inconnu feed on is much smaller. I also realize that we have to use a sink tip line, and therefore I didn’t want to make a heavy (weighted) fly. I use many strange, but effective fly fishing techniques, and have developed my own ideas and rules over the years. When I use wet flies, streamers or nymphs on a floating line, I always use patterns with some weight inside. If I use sinking or sinktip lines, I prefer light or even unweighted flies. This gives the fly much more action (which I call opposite action). This allows more variety in retrieval speed, and gives the fly some extra mobility as well. With these techniques, I also can do a lot more with the rod tip. The Inconnu has many names, and because it is most often described as the Tarpon of the North, I wanted a fly that had a good saltwater look as well. Another good reason to follow these thought processes was the stories I had read about the possibility that the Inconnu may have migrated from saltwater into the fresh water rivers and lakes in the distant past.
I finally found the “magic touch” one day when looking through my wet flies. I found a very nicely weighted saltwater streamer, with heavy tungsten eyes on top. I used this fly with unbelievable success in a shallow Norwegian fjord with a floating line. Starting an experiment, I changed a few materials and left out the weight, but I wasn’t very satisfied at first. It took me a few more weeks before I finally got the idea to use a hot glue gun as I also do for my large pike streamers. I had seen some fly tiers in Denmark and Sweden using this trick for their favourite sea trout flies in the Baltic Sea. Instead of the tungsten eyes, I created a soft head from the melted glue. This would make the flies light and transparent, and the long wing gave the fly an unbelievable action. The hot glue makes a wonderful head, and as long the glue is not fully dry, it can be formed and molded into many forms and shapes. You have to experiment because a good shape not only greatly increases the fly’s action, but also makes casting much easier as well. I simply prefer a realistic “fish head” shape. This hot glue was an excellent idea because when it is still warm, it gets deep into the fur, hairs and synthetics, which also makes this pattern much more durable. Other great benefits of using this hot glue are: It is softer and not as heavy as epoxy; Epoxy flies usually sink quickly, and hot glue doesn’t. I like many epoxy flies, and its great material to experiment with during the winter months, but I honestly must confess that I prefer a much softer material for the Inconnu flies that I had envisioned. I strongly believe that a fish feels with its mouth as we do with our fingers, and because the Inconnu belongs to the Whitefish family, I thought that even those big fish must also have a very soft and sensitive mouth. That’s why I chose the hot glue and not the epoxy! It was great to experiment with the hot glue gun, and a few weeks after my first trials, I pressed some very realistic holographic fish eyes into the hot glue to give the pattern a more realistic look. It was easy to add the eyes between two layers of glue, and the final result was also more attractive. I tried the pattern in a bathtub, then in a nearby pool, and the action with a sinktip line was incredible; above all expectations.
I tested the fly on some little pike during the winter, and made a few more changes to improve the durability. I also sent the pattern to a few of my friends to test it for me while doing some saltwater fishing. Their results and feedback were amazing, especially with respect to the mobility and action of the fly. After many weeks of trials and experiments, I was finally sure that this was to be the fly that I wanted to use for Inconnu in the summer of 2001. This was exactly the fly I was looking for.
The materials for my Inconnu flies
The final hook choice was the Sea Prince from Partridge (code CS52), and I decided to use size 1. Its an extremely strong hook, and in spite of my concern that the wire could be too thick, I still made this choice. I didn’t know how big the Inconnu really would be, so this hook could be perfect or a real disaster. It was just a guess, and later I learned how effective this choice really was. For the tail, beard or throat material, I used soft body hair from rabbit, hare, arctic fox and mink, and I also experimented with similar substitutes. I used dyed materials in several bright colors as well. It was not easy to find the fur that I really needed, because I wanted it quite long. I also wanted at least the same action, or perhaps better then the flies in my large Bondal series of Atlantic salmon flies. I personally prefer fuzzy stuff, with long under-fur that occasionally includes a few extra long, tapered hairs. Mink and arctic fox are just perfect, and therefore became my favorites.
For the body material, I mainly used Light Bright or Angel Hair, which is a wonderful synthetic dubbing, but any other extremely fine, flashy and shiny dubbing material should have a similar effect. Depending on what color I want for the bodies, I also use Crystal dub, or I make my own mixture with soft hair and synthetics. The original Crystal Flash makes really wonderful bodies as well.
In a few of my new Inconnu patterns I have included some complete hackle feathers. Those flies turned out to be very successful as well. I didn’t use the fibers, but rather a complete feather, and I mainly used saddle hackles. My personal choice is a high quality feather from a natural grizzly saddle cape.
For the wing, in my opinion, only one material is perfect for all saltwater and similar patterns. This, of course, is polar bear. This wonderful material, however, is strictly forbidden in Holland and many other countries so I can’t use it because we have to respect rules and regulations. I also don’t like to kill wild animals for their fur or feather or any reason. Reasonable substitutes are goat, arctic fox and bucktail. I build up the wings and mix in Crystal flash, flashabou, flashabou tinsels, holographic tinsels or any great looking holographic fiber material, and even Crystal hair. As topping, I sometimes use strands of peacock herl, and for the eyes that I add to the melted glue, there are many superb fish eyes available nowadays!
The best can advice I can give you is to buy the best hot glue gun you can find. There are many of my friends who bought a cheap model. While theirs soon failed, mine is still working! Furthermore, you will need transparent melt glue sticks and a good marker.
The patterns
I have no particular names for my Inconnu flies so far, but I prefer to tie the series without names anyway. The reason is quite simple; all patterns have just slight differences. Most of the flies are quite similar; with only the colors I use being different. Of course I experimented a lot with other materials, and made some trials with marabou as well. There is still a lot left to accomplish with these patterns. The dressings below will probably give you the best idea as to how I build up my Inconnu flies. So just give it a try, make your own changes, and use your imagination and creativity well! The flies I designed were especially for the Inconnu, but I can assure you that they will work for many other saltwater species too.
The Dressings:
Inconnu No 1
Hook: Partridge Sea Prince size 1 (code CS52)
Thread: Transparent or white (clear monifil works great as well)
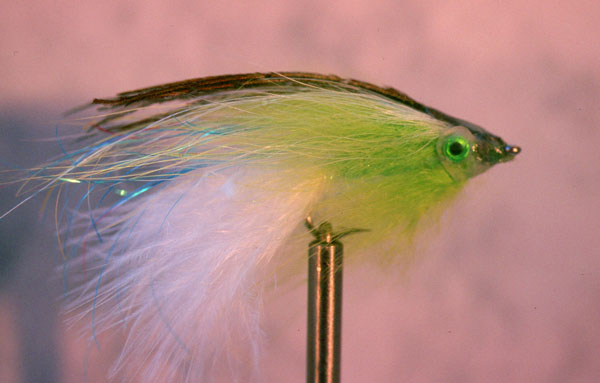
Tail: A nice bunch of chartreuse colored under-fur (rather long) with some nice soft hairs sticking out about 5-6cm. (tapered is preferred) A few strands of silver colored holographic flashabou mixed with a few strands of light green flashabou on top of the tail
Body: Light green light bright mixed with white and pearl and dubbed firmly
Wing: A build up wing with green flashabou (fine) at the bottom, tied in as long as the tail. I also experimented a lot with a nice tapered bunch of angle hair! Over this, I put a nice bunch of polar bear substitute, tapered again, and tied in as long as the tail. Natural white bucktail, extra fine (soft), and of very high quality seems a very good substitute. On top of the wing, a few (12) strands of peacock herls (I take the fibers close to the “eye” of the peacock eye)
Throat hackle: chartreuse colored under fur (pretty long)
Head (under layer): For the first layer of the head ….. shape it like a cone, and press flat at sides
Eyes: Red colored flat fish eyes (adhesive) stick on both sides of the head under layer
Head final: Melt glue (transparent) over the eyes and under layer
Inconnu No 2
Hook: Partridge Sea Prince size 1 (code CS52)
Thread: Transparent or white (clear monifil works great as well)
Tail: A nice bunch of white colored under fur (rather long), with some nice soft hairs sticking out about 5-6cm. (Tapered preferred) A few strands of pearl colored flashabou mixed with a few strands of light blue flashabou on top of the tail
Body: Kingfisher blue colored light bright, mixed with white and pearl and dubbed firmly
Wing: A build up wing with colored holographic flashabou (fine) at the bottom, tied in as long as the tail. I also experimented a lot with a nice tapered bunch of angle hair! Over this I put a nice bunch of polar bear substitute, tapered again and tied in as long as the tail. Natural white buck tail, extra fine (soft) and of very high quality seems a very good substitute. On top of the wing, a few (8) strands of extra fine blue-silver colored holographic flashabou tinsel
Side wings: On each side, a good quality grizzly hackle
Throat hackle: Kingfisher blue colored under fur (pretty long)
Head (under layer): For the first layer of the head ….. shape it like a cone, and press flat at sides
Eyes: Red colored flat fish eyes (adhesive) stick on both sides of the head under layer
Head final: Melt glue (transparent) over the eyes and under layer
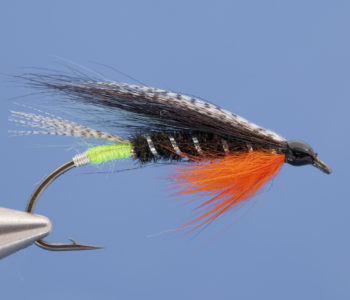
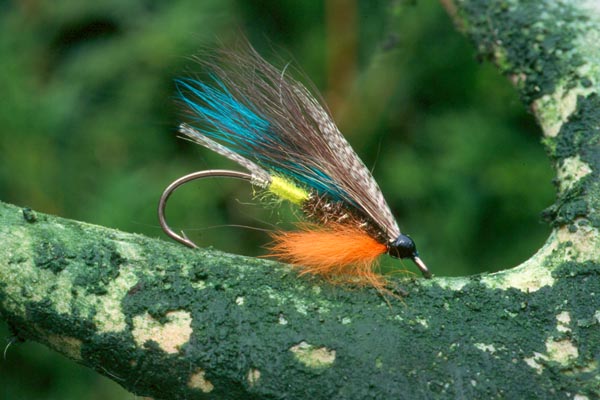
Inconnu No 3 (one of my favorites)
Hook: Partridge Sea Prince size 1 (code CS52)
Thread: Transparent or white (clear monifil works great as well)
Tail: A few strands of silver and blue colored holographic flashabou tinsel (about 6-7cm) Then a small bunch of white and hot orange colored under fur (pretty long) mixed and with some nice soft hairs sticking out about 5-6cm. (Tapered preferred and hot orange; twice as much as white.) On each side of the tail a grizzly hackle (8 cm)
Body: Peacock colored light bright mixed with white and pearl and dubbed firmly
Wing: A build up wing with blue colored holographic flashabou (fine) at the bottom, tied in to half way up the tail. I also experimented a lot with a nice tapered bunch of angle hair! Over this I put a nice bunch of polar bear substitute, tapered again and tied in as long as tail. Natural white buck tail, extra fine (soft) and of very high quality seems a very good substitute. Next a few (14) strands of extra fine blue-silver colored holographic flashabou tinsel. On top of the wing some polar bear substitute again.
Side wings: (I tie this fly with and without side wings.) At each side, a good quality grizzly hackle tied in at the front of the body.
Throat hackle: Hot orange colored under-fur (pretty long)
Head (under layer): For the first layer of the head ….. shape it like a cone, and press flat at sides
Eyes: Red colored flat fish eyes (adhesive) stick on both sides of the head under layer
Head final: Melt glue (transparent) over the eyes and under layer
The general tying steps:
Step 1
Place the hook in the vice and wrap the entire shank with the tying thread. This avoids the difficulty of a slipping wing and head when the fly is finished. Cut off a nice bunch of hair for the tail and secure it well to the top of the hook shank. Let the fibers stick out about 5-7cm. You can be very flexible with this size, so experiment with the length!
Note: You also can choose to tie in some strands of flashabou first, then the hairs for the tail, then put some extra flashabou on top again. A mixed tail works great as well. You can use white plus any other color fur, or choose a combination of other very effective colors that coordinate well with the wing or body colors.
Step 2
Tie in the flashabou on top of the tail. Secure all the tail material well on the hook shank!
Note: If you want to include the grizzly hackles in the tail you, have to do it in this step! Be sure you tie in the feathers so that they are pointing out to create the most action and mobility when the fly moves through the water!
Step 3
Apply your dubbing material to the thread. Start as close as possible to the tail, then forward and return backwards again. Finish with your dubbing in front again. Actually, you have 3 layers of dubbing. Be sure you make your wrappings very tight!
Note: You can twist your dubbing, or use any dubbing twisters or whirls to make a strong body. I tie the body pretty tight, but always pick out some fibers when finished.
Step 4
Now make the wing. The traditional way to make the wing is to build it up. The holographic fibers are added first, than then the goat or bucktail fibers, and finely the next layer of flashabou strands or other topping to finish the wing.
Note: Be sure the wing is pretty long. At least as long as the tail! The wing has to be of good volume as well, so do not don’t be too sparse with your materials. There is one minor rule I use for my wings: Make them tapered and
never cut them, just pull out the hairs and fibers until the wing has a wonderful and tapered shape.
Step 5
Tie in a long bunch of soft rabbit fur as beard or throat.
Note: Make the beard or throat long, and be sure you cover the hook point with it! You must always use very soft hairs, so select them well, pick out, and then tie them in!
Step 6
Now take your glue pistol. Be sure the glue is warm enough to spread inside the hair. Build it up slowly. Let it dry for a few seconds, and then push it flat with your fingers. Make a nice looking tapered-cone head. If dry, then color the top to give it a more realistic look.
Note: Melt glue without a glue pistol works too, but it will be much harder to get your beautiful transparent color. Always flatten or squeeze the head from the side, because that will give your creation the best action in the water.
Step 7
Now put the eyes on both sides, and cover everything again with your second layer of melted glue. The fly is finished as soon the melt glue has dried.
Success