Organza Wings
Winter is surely high season for a fly tier. When the weather turns bad, and the rain starts to hit the windows, it feels good to sit inside, in front of your desk, and tie some flies. The worse the weather, the more flies that can be tied, as well as developed! A lot of my wintertime is devoted to improving old patterns and devising simple, effective and quick tying techniques that will not alter the floatability, mobility and durability of the fly. With the many flies I have tied over the years, I have always tried to improve the dressings while keeping these three important aspects in mind. When I roughly sketch a fly after a good idea, or quickly put something together on the riverbank, it sometimes takes me hours to properly work it out at my tying desk. It feels good to be busy and watch the improvements. At home, with many materials available, I always try to improve any fly with which I haven’t been 100% satisfied. When I am fishing, I usually fish for many hours at a time, and therefore the durability and floatability of my flies will always be of the highest priority.
A FEW EXCEPTIONS
The mobility and action of a good looking fly is a completely different. While often fishing for sea trout in the coastal waters of Denmark, I previously discovered some serious problems with ordinary streamers. Most of the problems concerned “foul winging” (the wing slips around the hook bend), as well as unsatisfactory movement in the water. Some of these patterns were gifts, and great looking flies as well, so I made it a priority to improve their mobility and action. Since I made a lot of important discoveries about the silhouette that flies produced while viewed from below, especially against bright sunlight, I also spent much time in the improvement of the shape of certain flies. Notes in your fishing dairy made while fishing are indispensable in perfecting those patterns later on.
THE USE OF SYNTHETICS
I love tying with natural material. To make a fly more durable, however, I usually grab some synthetics as well. I like a good combination of natural and synthetic materials, but only if they can be used together in perfect harmony. When I tied the first parachute flies from my large L.T. (light tan) series, I used mostly calf tail or reindeer hair as winging material. The calf tail was too bulky when tied on the hook shank, and thus prevented me from making slim and tapered bodies. These patterns sank rather quickly as well. The reindeer hair was too fragile, and also made the flies more difficult to cast with an extremely fine tippet. I was not satisfied with it, so after a search, and I exchanged both materials for poly yarn and Organza. My Organza patterns were just experiments in the beginning, and I mainly tied them for enjoyment. Some of the resulting patterns, however, turned out really nice. In this article, I want to tell you about how I started to work with organza, and found some nice tricks to handle it. I think organza is a wonderful material, and because I use it in a unique way, I’m sure that I can give you some valuable tips. I will also tell you something about my tying techniques that developed spontaneously during the long winter evenings, (with perhaps a little help from a good glass of fine malt whisky)!
SIMPLE AND CHEAP
Organza is very cheap and a well-known product to women as a raw material for wedding dresses. Unfortunately, it becomes very expensive when sold in small sheets fly tying! It is not a new material, and it has been used for fly tying in the USA for a very long time. In Central Europe, it is better known as Magic Spinner Wing, and was made popular by Roman Moser several years ago. In the Scandinavian countries, I saw it used on flies for the first time in the early eighties.
MULTI-USE PRODUCT
Organza is a multi-use product especially in the skillful hands of a creative fly tier. It can be used for almost all types of flies, but I use it mainly for all types of wings on dry flies, or sides on streamers. I am very fortunate to have some good friends in the States, who keep me well supplied. Organza is very simple to work with, and the fine, extremely durable fibers have a nice sparkle and glow to them. It is available principally in white, but it is easy to dye in any color without losing its sparkle effect. You can work it with scissors, wing burners and even by hand. It is neither affected by acetate, wing cement, varnish, Permaflote, nor many other chemicals.
CUTTING AND STORAGE
When I get a large piece of organza, I usually cut it into smaller sheets (10 by 15 centimeters), so that I can store it much easily. I dye several of those sheets in my favorite colors in order to match the hatch as closely as possible. I also dye some of the sheets in fluorescent or bright colors, in order to create special effects with organza fibers on the sides of my saltwater patterns or hairwings. After dying and drying, I store the sheets color by color, in airtight plastic bags.
To keep the tying procedure as simple as possible, I use three simple methods to prepare the organza sheets. These are explained in the accompanying drawings.

PREPARING ORGANZA
A sheet of organza 15 by 10 centimetres. The fibres are enlarged in the drawing to give an impression of the structure of the material.

HOW TO GET LONG SPARKLED FIBRES FOR SPENT FLIES, STREAMERS, SIDES OR HAIRWINGS
PREPARING LONG FIBERS (Method 1)
How to get long sparkle fibers for spent flies, streamers, sides or even hairwings for salmon flies. This is the basis for my first and simplest technique. You just pull away the fibers from the edge of this sheet, and when you have collected a small bunch of fibers, you can then do lot of interesting things with them.
A large bunch of lose fibers can be burned at the end to keep all the loose fibers together easily.
A good tip is to use a few bright colored of organza fibers and mix them with the other winging material to get a very fine sparkling effect in a wing. This can make your fly more successful in certain circumstances. It has the same effect as using fibers of Kristalflash, Spectraflash or Flashabou, but less shiny because organza is not as bright and flashy, and in my opinion, better suitable for waters where fish do not like patterns which are too bright. The other reason that I prefer organza is because the fibers are much finer, and they not only impart a good action to the fly, but make it much easier to tie a fly with a head which remains intact.
To make a spent fly, delta wing, or bunches for parachutes or Wulff variations, I take a bunch of long organza fibers and fold them together to get as many fibers as required for the wing type I prefer. I then cut all the fibers the same length on both sides, and tie them on the hook shank as spent, sides, delta, bunch or Wulff wing.
THE MAKING OF A REALISTIC WING (Method 2)

Cut a small piece of organza from the larger sheet. This is the method to make small realistic wings on spent flies.
Place a small piece of organza between a wingburner (3a). This makes a half wing (3b). Replace the piece in the burner (3c), burn again and the wing will be perfect (3d). Finally cut out two small pieces in the center of the wing (3e).
The realistic wing can easily be tied on the hook shank, and secured with Super Glue, poly yarn, dubbing, floss or tying thread; whatever you prefer. This burning technique makes the wings extremely durable. It is one of my favorite tying methods for realistic wings.

PREPARING FIBERS WITHOUT WASTE (Method 3)
I created this method when I first bought the small expensive sheets from tackle stores without knowing that it was organza. Even now, when I have many square meters of it, I still use this technique, especially for small flies. It is the quickest and most effective way to get the fibers loose from the sheet.
Cut a small piece from a larger sheet. Pull out some fibers from one side of the sheet (4a) Turn the small sheet in your hands and pull fibers from the other side (4b). Pull off more fibers from the other side and repeat this until you have enough to tie your fly (4c-4d) If you put the loose fibers in a hair stacker (4e) they can be leveled before tying in.


To show you some possibilities with organza as wing material, I selected a special set of flies that came from my large LT series. I chose some spent flies, several upwinged flies, a delta wing, and two USD patterns. In the dressing, notice which method I use for preparing the organza fibers in that particular pattern.
THE DRESSINGS AND TYING TECHNIQUE
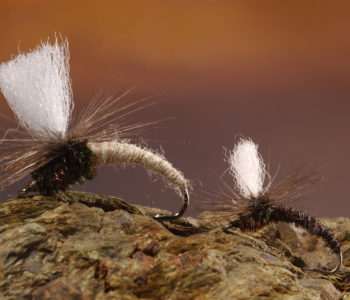
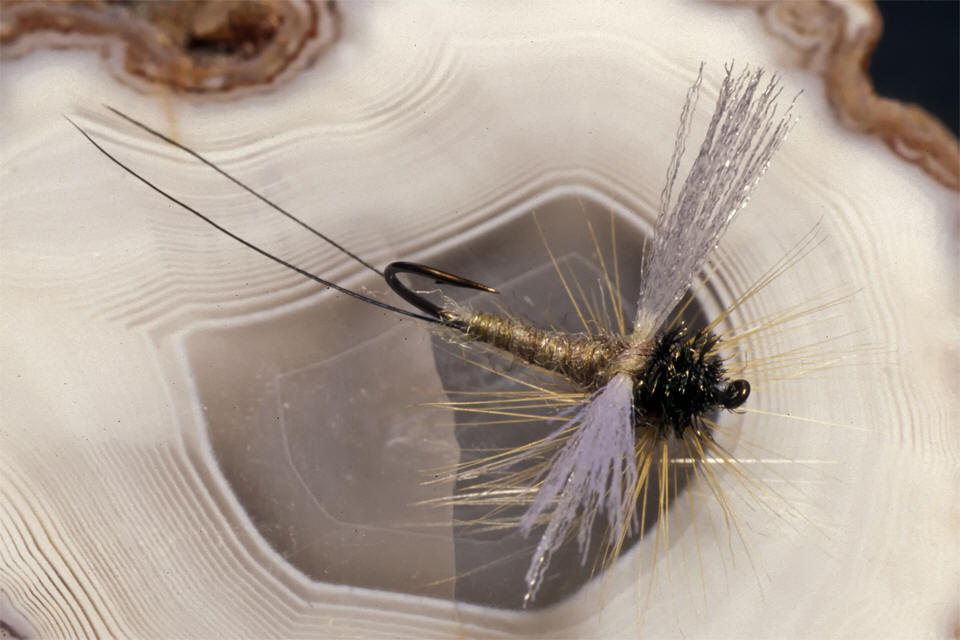
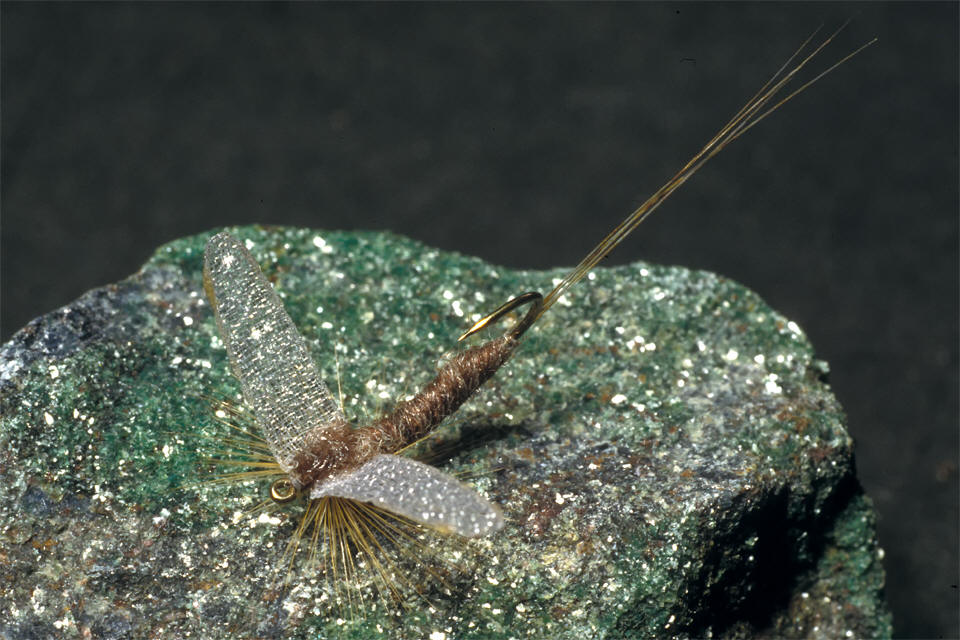
The Kvennan Spent and Klinken’s USD spinners.
Brain Clark and John Goddard’s (UK) USD (up side down) pattern inspired me to think about developing my own USD pattern just for fun. Hank Leonard and Bill Luzardo’s (USA) L&L fly gave me an excellent idea for winging. Tomas Olson’s (Sweden) special parachute technique was indispensable for the things I had in mind. Combining all those ideas made it possible to create a pattern in my own style. Unfortunately, my USD patterns are not at all easy for beginners to tie, but I shall try to describe the tying technique as simply as possible. For these patterns I use method 2 to create the wing.
Note 1: Both patterns have hooked some very large fish, but to be fair and objective, I must agree that I missed some good fish too, especially on my USD variation. It just depends how aggressive the fish will take the fly and in what area of Europe you will fish. Scandinavian grayling seems to have no problems at all to take patterns like these.
Note 2: I use mainly light tan poly dubbing and white organza (fibers) but off course you can do a lot of experiments with your own color variations to match the hatch.
Kvennan spent (L.T. series no 40)
Dressing
Hook: Daiichi 1170 or 1280 size 12, 14 and 16
Thread: UNI-Thread Yellow, tan or Danville’s spiderweb
Body: Fly-rite light tan poly dubbing no 19 (Borger color System (BCS) 91/95)
Tails: Two javalina (peccary) fibers
Wing: Organza (white) burned into shape as shown in method 2
Wingcase: Cream poly yarn or dubbed poly dubbing no 19
Legs: Natural deerhair works well but hackle fibers are better, more durable. I use a brown medium large hackle.
Tying Steps
 Tie in two peccary fibers in V shape.
Put on some poly dubbing and make a nice tapered body 2/3 of hook shank.

Tie in a small piece of poly yarn and a brown hackle
Dub hook shank, very sparsely on thorax.
Wind the hackle over the thorax, tie off and cut hackle at top and bottom.
Make wing as in drawing 3a-3e.
 Put wing on the thorax, secure with the poly yarn. Tie off and varnish. To totally secure wing, apply a drop of waterproof super glue on the wing case.
The completed fly
Dressing
Hook: Daiichi 1170 or 1280 size 12, 14 and 16
Thread: Danville’s spiderweb
Body: Fly-rite light tan poly dubbing (no 19-Borger color System (BCS) 91/95)
Tails: Two peccary fibers
Wing: Organza fibers Use method 1 or 3
Wingcase: Peacock herls
Thorax: Peacock herls
Hackle: Light ginger tied as parachute
Base for parachute: Poly-yarn
Tying Step
 Tie in a piece of poly yarn and hackle
Pull wing, hackle up, secure with thread.
Tie in two peccary fibers as tail
 Dub tapered body on 2/3 of hook shank
Turn hook in vise. Tie in two peacock herls
Tie in organza fibers, secure with thread and pull up just a little. Keep the fibers up with some extra wind ings of thread.
Wind peacock to form thorax. Make two windings behind & between the wings. Put tiny drop of varnish or superglue on the windings before wrapping over the peacock herl. Tie off.
 Turn hook in vice, secure. Wrap base for hackle with spiderweb. Turn hackle from right to the left around post. Work from top to bottom. Pull end of the hackle to the left and tie off between hackle and body with your whip-finish tool. Cut off poly yarn just 2 millimeter above hackle. Heat needle with lighter. Touch on butt of wing post to fuse into hackle. This is probably the most durable parachute hackle you can make.
Dressing
Hook: Daiichi 1170 or 1280 size 12, 14 and 16
Thread: Danville’s spiderweb
Body: Fly-rite light tan poly dubbing (no 19-Borger color System (BCS) 91/95)
Tails: A small bunch of micro fibetts or spinner tails
Wing: Organza burned into shape. Use method 2.
Wingcase: Poly-yarn
Hackle: Light ginger tied parachute style
Base for parachute: Poly-yarn
 * Same as Klinken’s USD spinner no 1 except without thorax.
* Wrap dubbing to hook eye.
* Dub thorax area lightly
*Secure wing poly yarn on hook, bond with small drop of waterproof superglue.
Dressing
Hook: Daiichi 1170 or 1280 size 12, 14 and 16
Thread: Danville’s spiderweb
Body: Fly-rite light tan poly dubbing (no 19-Borger
color System (BCS) 91/95)
Tails: A small bunch of micro fibetts or four spinner tails split in two sections
Wing: Organza fibers. Use method 1 or 3
Wingcase: Poly dubbing
Tying Steps

Tie in organza fibers as spent wing, secure well with thread.
Tie in 4 spinner tails and split into V shape or just take a small bunch of micro fibetts. Just what you pre fer. Best way to split tails is to put on little dubbing as mini-tag before tail is tied in.

Pull all fibers in vertical direction, cut to same length.

Dub, wrap towards hook eye, forming tapered body. Secure wing well with dubbing. Avoid bulk. Tie off, varnish.
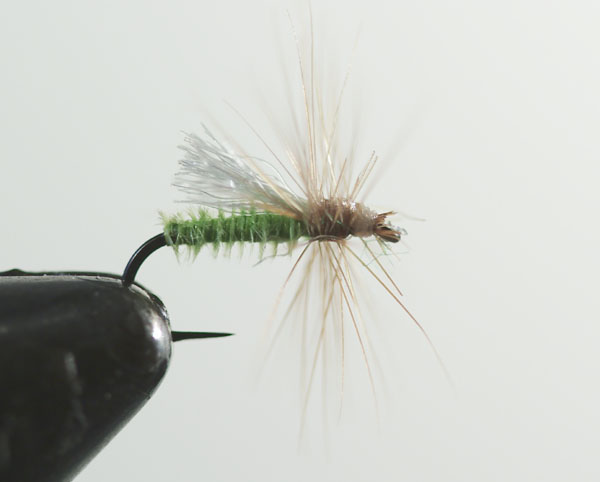
Magic Delta Wing (L.T. Series no 20)
Dressing
Hook: Daiichi 1170 or 1280 size 12, 14 and 16
Thread: Danville’s spiderweb
Body: Fly-rite light tan poly dubbing (no 19-Borger color System (BCS) 91/95)
Wings: Organza fibers. Use method 1 or 3
Hackle: Light ginger
Tails: A small bunch of micro fibetts
Tying method:
- Same as L.T. Spent Spinner
- Same as L.T. Spent Spinner
- Same as L.T. Spent Spinner
- Dub, form a nice tapered body. Pull wings back to 45 degrees and up slightly. Secure with thread. Tie in the hackle.
- Wind hackle, tie off, varnish. Cut off a few hackle fibbers at the bottom to get a better contact with the surface film.


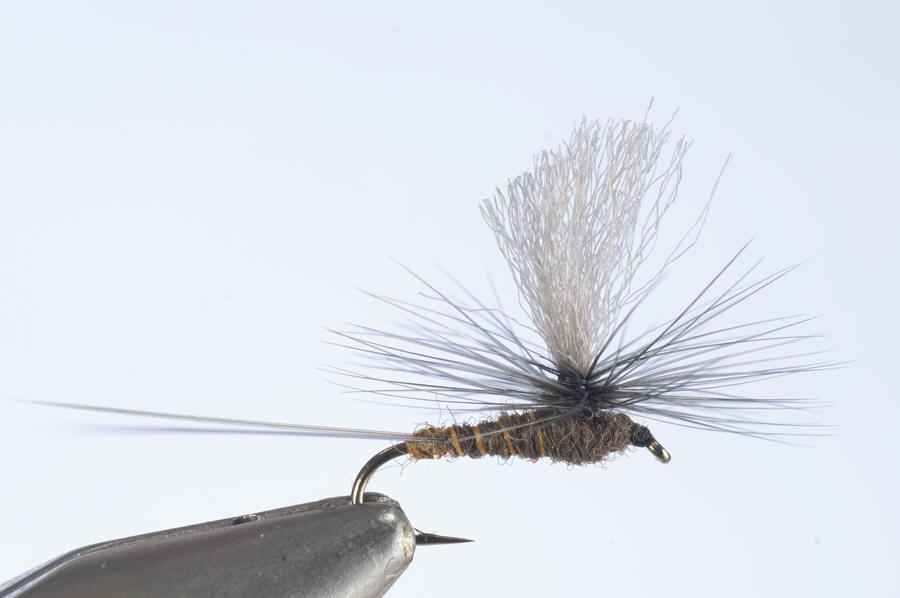
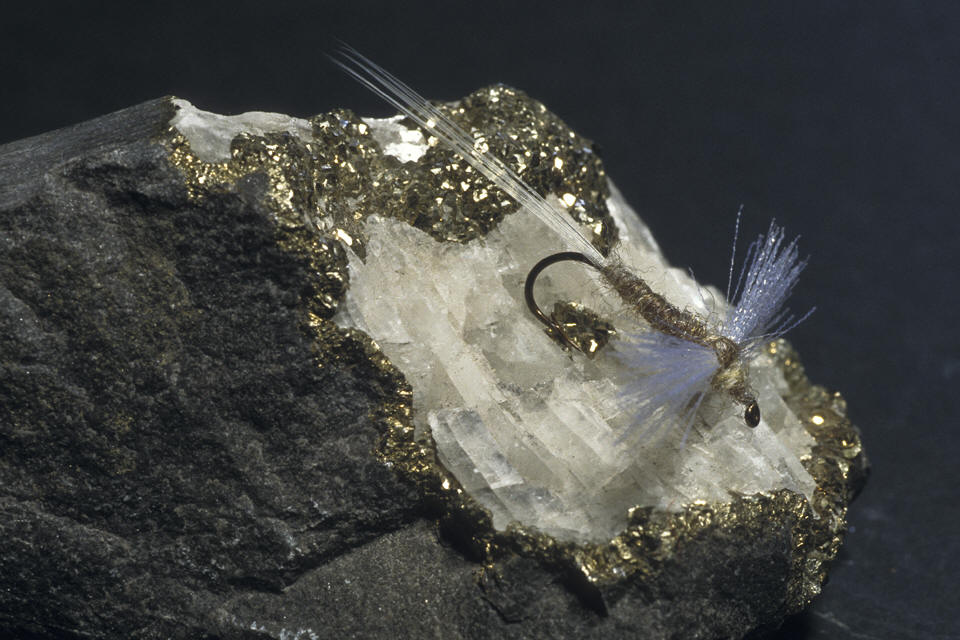
Nora (L.T. series no 39)
This is one of my favorites. An extremely effective pattern especially if you tie in the right size and color.
I named the fly after the River Nora in Norway where this pattern is a deadly fly for trout and grayling. Tying a very slim version of this pattern with just a little dubbing, a few fibbers of organza and a split tail of 4 spinner tails makes a superb fly for very selective trout, or when fishing in crystal clear waters.
Dressing
Hook: Daiichi 1170 or 1280 size 12, 14 and 16
Thread: Danville’s spiderweb
Body: Fly-rite light tan poly dubbing (no 19-Borger color System (BCS) 91/95)
Tails: A small bunch of micro fibetts or spinner tails
Wing: Organza fibbers. Use method 1 or 3
Wingcase: Poly-yarn
Hackle: Light ginger
Tying Steps
 Tie in tails. Tie in small bunch of organza fibbers and secure well. Fibbers must point forwards 45 degrees. About 5 mm behind wing, tie in a small piece of poly yarn and light ginger hackle. Bring thread to bend, apply dubbing.

Split wing into two sections. Pull poly yarn through the hackle and wing sections. (See front view)

Form nice tapered body towards eye.
Wind hackle + some turns of thread behind the wing + several in front.

Tie off, varnish. Put a little drop of varnish on wing case. For a better contact with the water surface, cut away some hackles from underneath.