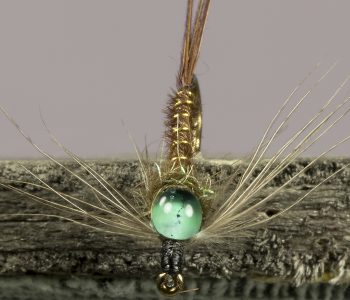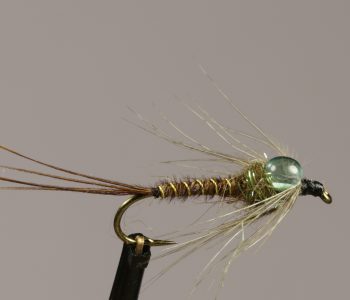
Tying damsels and Dragon nymphs
A SPECIAL TYING TECHNIQUE
The special technique I use to produce the tail I like very much and I got a lot of very nice compliments during my demonstrations. The completed tying technique is a mixture of Oliver Edwards techniques mixed my own idea’s, which produce a beautiful tying technique for any realistic nymph pattern today.

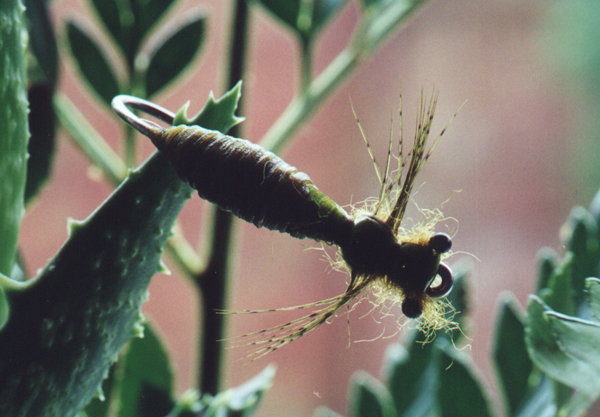
DAMSEL NYMPH

Hook: Partridge H1A size or any extra long shank hook with straight eye
Thread: Uni 8/0 ligh yellow or olive (this will be the colour for the underbody)
Tail: Three Emu or Ostrich herls
Body: Green flexibody, latex or thin skin
Wing-buds: Green herls
Wingcase: Green flexibody (thin skin)
Thorax: Olive dubbing
Legs: Partridge feather
Head: Dubbing and Flexibody
Eyes: Monofil burned at both sides
Step 1
Cut of a nice strip of Flexibody or latex. You should slightly taper it at the end and tie it in by its fine tip. (Taper it from 1.5mm up to maximum about 2.5mm wide) Put the strip in a hackle plier. Stretch it a little and make you first winding around the hookshank. Hold on the tension and ensure that your next winding slightly overlaps the previous one. Let the plier hang down and put some extra weight on it. (This is why I produce my own tool for keeping it under tension)
Step 2
Tie in the first tail fibre exactly on top of the hookshank and lay it over the just finished wrappings of flexibody. This will be the centre of the tail. I prefer Emu or peccary because they are stiff, durable and more tapered.
Step 3
Make two more windings with the flexibody around the hookshank and base of the tail. Now take the two other tails and tie them in at each side of the hookshank. This technique will form the left and right side of the split tail. Because of the underbody of flexibody and tension of the tying thread the tail will spit automatically to left and right as soon as you secure them with your tying thread. Now make a nice, slim but tapered underbody of tying thread.
Step 4
Continue the body with the flexibody and let each turns overlaps the previous one again. Make a tapered body not further until 2/3 of the hookshank is covered. Don’t cut the flexibody but let it hang down under tension again.
Step 5
Tie in four small pieces of olive coloured feather herls on both sides of the hookshank. Those will produce the wing-buds in step 7. Pull them backwards and continue the body with two more and very close overlapping windings of the flexibody. Now you can cut off the flexibody.
Step 6
Take the piece of flexibody that is left and tie it in again on top of the hookshank and pull it backward in the same direction as the herls.
Step 7
Take now a small partridge hackle. Tie it in at the tip on the hookshank with the fibres pointing backward and inner side on top. Pul the partridge feather over the flexibody so it is not in the way.
Step 8
Spin on some dubbing for your thorax and wind it up to the hook eye. Leave about 1 or 2mm space. Pull the partridge hackle over the thorax so that you get same number of fibres on each side of the hookshank and secure the hackle well. Then pull the two herls crossword over the hackle to pull the fibres down and produce the legs of the insect. Secure it all with the flexibody (wingcase) by pulling it over the feather and herls and use only two windings of your thread to keep it tight. DON”t cut the strip yet. It should be pointing over the hook eye now.
Step 9
Take a piece of monofil and burn two equal eyes at each side. The best way is to burn it between a pair of tweezers. Burn them as close as you can. Let the eyes cool down and tie it in exactly at the place where you secured the flexibody. Use figure of eight knots to make it most durable. Spin on just a slightly bit of dubbing to camouflage the windings.
Step 10
Now pull the strip of flexibody backwards again between the eyes and tie it off after the eyes and in front of the legs. Cut off the strip halfway the wingcase.
Step 11
Pick out the dubbing with velcro and check the legs. Varnish your windings and the result will be a beautiful and perfect imitation of a realistic damsel. The same technique you can use for many nymph imitations too.

THE DRAGON FLY NYMPH
Hook: Any extra long shank hook with straight eye. I prefer wide gab
Thread: Uni 8/0 ligh yellow or olive (this will be the colour for the underbody)
Underbody: Wool or floss
Body: Green flexibody, latex or thin skin or acetate floss
Wing-buds: Flexibody green
Wingcase: Flexibody green
Thorax: Olive dubbing
Legs: Partridge feather
Head: Dubbing and Flexibody
Eyes: Monofil burned at both sides
TYING TECHNIQUETYING TECHNIQUE
Step 1
Produce a big nice underbody as long as 2/3 of the hookshank. Be sure the body can’t turn around when finished.
Step 2
The first technique I use as next: Put acetate in an empty nail-polish bottle. Wrap 3 layers of olive acetate floss around the body and secure it. Take the nail-polish brush with acetate and wrap the acetate around it until the floss is melted together. Make sigments by pressing monofil into the soft body. Let it dry and harden.Second technique: Just take flexibody and wrap it around the underbody. If you don’t have flexibody you can use thin skinn ot similar material.
Step 3
Take a strip of flexibody and cut out two small wing-buds. Tie it in with the wing-buds lying over the body (abdomen) Take another piece of flexibody and tie on the hookshank and pull it backward over the body.
Step 4
Take now a small partridge hackle. Tie it in at the tip on the hookshank with the fibres pointing backward and inner side on top. Put the partridge feather over the flexibody.
Step 5
Spin on some dubbing for your thorax and wind it up to the hook eye. Leave about 1 or 2mm space. Pull the partridge hackle over the thorax so that you get same number of fibres on each side of the hookshank and secure the hackle well. Pull the flexibody (wingcase) over the feather and use only two windings of your thread to keep it tight. DON”t cut the strip yet. It should be pointing over the hook eye now.
Step 6
Take a piece of monofil and burn two equal eyes at each side. The best way is to burn it between a pair of tweezers. Burn them as close as you can. Let the eyes cool down and tie it in exactly at the place where you secured the flexibody. Use figure of eight knots to make it most durable. Spin on just a slightly bit of dubbing to camouflage the windings.
Step 7
Now pull the strip of flexibody backwards again between the eyes and tie it off just after the eyes but just before the legs. Cut off the strip halfway the legs.

